Introduction
If you’ve ever been to a potluck, church supper, or family gathering in the American South, there’s a good chance you’ve heard of “sex in a pan.” Despite the cheeky name, it’s a wonderfully simple concept: a buttery nut crust topped with layers of sweetened cream cheese, chocolate, and whipped cream, all chilled until firm and sliced into neat squares. The traditional version leans heavily on white sugar, boxed pudding mixes, and graham crackers — none of which are ideal if you’re managing diabetes, watching carbs, or simply trying to cut back on refined sugar.
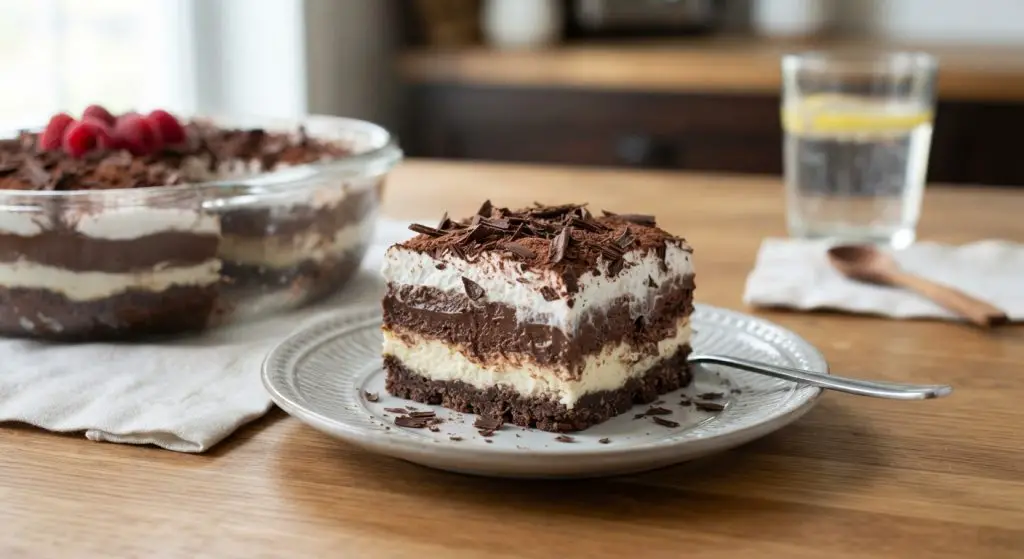
This version keeps everything that makes the original so beloved — the contrast of crunchy crust, tangy-sweet cream cheese, rich chocolate, and airy whipped cream — while swapping out the ingredients that spike blood sugar. Almond and pecan flour replace wheat flour and graham crumbs, and a monk fruit/allulose sweetener blend replaces sugar throughout. The result is a dessert that’s just as decadent, but far friendlier to a low-carb, keto, or diabetic-conscious lifestyle. It takes about 45 minutes of active work, plus chilling time, and serves 16, making it a great option for parties, holidays, or anytime you want something impressive without needing an entire day in the kitchen.
Ingredients
Pecan Crust
- 1½ cups almond flour
- ½ cup pecan flour (or pecans finely ground in a food processor)
- 2 tbsp powdered monk fruit/allulose sweetener
- ⅓ cup unsalted butter, measured solid, then melted
Cream Cheese Layer
- ¼ cup heavy cream
- ¼ cup powdered monk fruit/allulose sweetener
- ½ tsp vanilla extract
- 8 oz cream cheese, softened to room temperature
Chocolate Layer (whipped-cream style, quicker than a cooked pudding version)
- ⅓ cup Dutch-process cocoa powder
- 1½ cups heavy cream
- ⅓ cup powdered monk fruit/allulose sweetener
- ½ tsp vanilla extract
Whipped Cream Topping
- 1½ cups heavy cream
- 2 tbsp powdered monk fruit/allulose sweetener
- ½ tsp vanilla extract
- 1 oz sugar-free dark chocolate, shaved with a peeler or grater for garnish
A note on the sweetener: a powdered monk fruit/allulose blend is worth seeking out specifically for this recipe, since it dissolves completely and avoids the gritty texture or cooling aftertaste that plain erythritol or stevia blends can leave behind, especially in the whipped layers.
How to Make It
Step 1 – Make the crust. Preheat your oven to 350°F and line a 9×9-inch (or similarly sized) baking dish with parchment paper, letting the edges hang over the sides for easy removal later. In a large bowl, stir together the almond flour, pecan flour, and sweetener. Add the melted butter and mix until the dough turns crumbly and holds together when pressed. Transfer the mixture to the lined dish and press it firmly and evenly across the bottom. Bake for 12–15 minutes, until the edges turn golden and the crust feels firm to the touch. Remove from the oven and let it cool completely — this step matters, because a warm crust can melt the layers you add on top of it.
Step 2 – Make the cream cheese layer. While the crust bakes and cools, combine the heavy cream, sweetener, and vanilla extract in a mixing bowl. Using a hand mixer, beat until stiff peaks form — the mixture should hold its shape when you lift the beaters. Add the softened cream cheese in small additions, beating well after each one, until the mixture is smooth and fully combined with no lumps. Once your crust has cooled completely, spread this mixture evenly over it using a spatula, working gently so you don’t disturb the crust underneath.
Step 3 – Make the chocolate layer. In a clean bowl, beat the heavy cream, sweetener, and vanilla until stiff peaks form, just as before. Gradually add the cocoa powder, beating it in a little at a time until fully incorporated and the mixture turns a rich chocolate color. Spread this over the cream cheese layer in gentle dollops rather than one continuous swipe, which helps keep the layers distinct instead of blending together.
Step 4 – Make the whipped cream topping. Repeat the same process one more time: beat heavy cream, sweetener, and vanilla to stiff peaks. Spread this final layer over the chocolate layer, then sprinkle the shaved sugar-free chocolate evenly across the top for both flavor and visual appeal.
Step 5 – Chill and serve. Refrigerate the finished dessert for at least 2 hours, though longer is fine and often improves the texture. This chilling time allows the layers to firm up so they hold together neatly when sliced. When ready to serve, use a thin spatula to lift out clean squares, wiping your knife between cuts for the neatest presentation.
Why This Is a Diabetic-Friendly Recipe
The traditional version of this dessert relies on granulated sugar in multiple layers, plus a graham cracker crust and often a boxed pudding mix — all sources of rapidly digested carbohydrates that spike blood glucose. This version addresses each of those issues directly. The nut-flour crust replaces refined flour and added sugar with fat and fiber, which digest more slowly and have far less impact on blood sugar. The sweetener used throughout doesn’t raise blood glucose or insulin the way sugar does, so each layer keeps its sweetness without the metabolic cost. And because there’s no added sugar in any layer, the tiny amount of natural sugar present (from the dairy itself) is negligible and not enough to cause a meaningful spike. That combination makes it possible to enjoy a genuinely rich, indulgent-tasting dessert while staying within a lower-carb or diabetes-conscious way of eating — though as always, portion size and individual carb tolerance vary, so it’s worth checking with a doctor or dietitian about how a dessert like this fits into your particular plan.
Nutrition (per serving, based on 16 servings)
- Calories: ~430
- Fat: ~44g
- Protein: ~6g
- Total Carbs: ~9g
- Fiber: ~4g
- Net Carbs: ~5g
- Sugar: ~3g (from dairy only, no added sugar)
How to Store
Cover the pan tightly with plastic wrap and keep it refrigerated; it’s best enjoyed within 1–2 days but will hold well for up to 4 days, with the whipped cream layer being the first to soften over time. For longer storage, the entire pan freezes well, or you can slice it first and freeze individual pieces on a parchment-lined tray until solid, then wrap and transfer them to a freezer bag — either way, it keeps for about 3 months. To serve from frozen, let it sit on the counter for 10–20 minutes to soften slightly, or enjoy it a little firmer for a texture closer to ice cream.