If you want a lunchbox that comes home empty, these animal mini pizzas are your secret weapon. A bunny, a bear, a kitty, a star and a heart: five adorable shapes made from one simple dough, one easy sauce and toppings your kids already love. They bake in about 15 minutes, they are soft and cheesy, and they taste just as good at room temperature as they do warm from the oven.
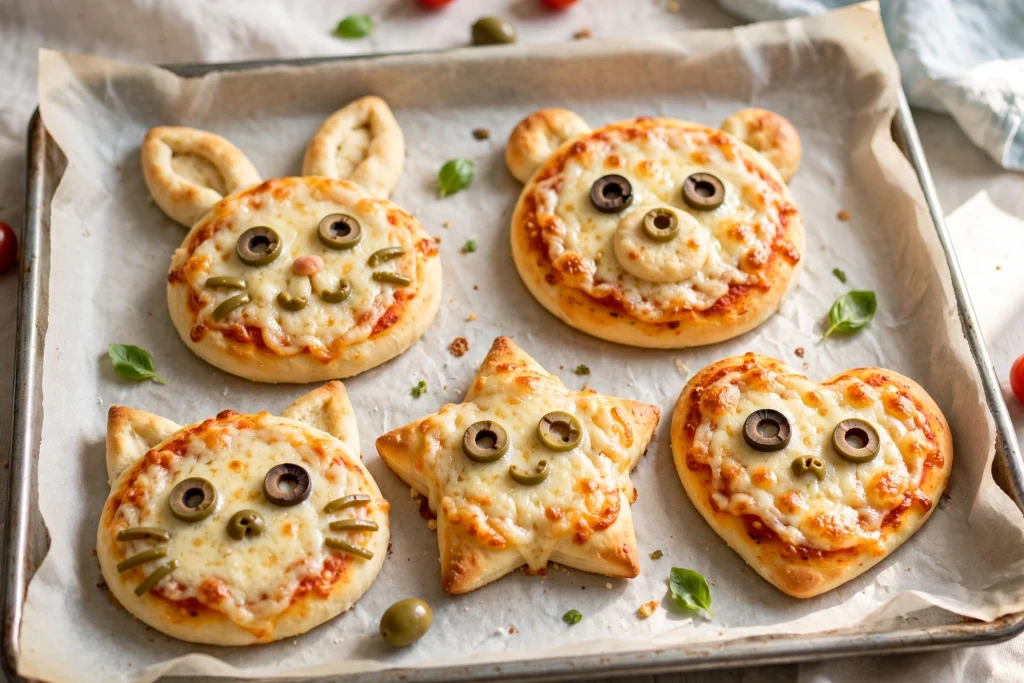
I created this recipe for busy parents who want something fun, homemade and realistic for a weekday morning. You can prep everything on Sunday, bake in batches, freeze the extras and pack a smiling pizza in a lunchbox any day of the week. No special skills, no fancy tools. If you can shape play dough, you can make these.
Quick Recipe Overview
- Prep time: 25 minutes
- Rise time: 45 minutes (or 0 minutes with store-bought dough)
- Cook time: 14 to 16 minutes
- Total time: about 1 hour 25 minutes
- Servings: 10 mini pizzas (2 per shape)
- Calories: about 190 per mini pizza
- Difficulty: Easy
- Best for: School lunchboxes, kids’ birthday parties, picnics, after-school snacks
Why Kids Love These Animal Mini Pizzas
Kids eat with their eyes first. A plain triangle of pizza is fine, but a bunny with olive eyes and pepper whiskers? That is a lunchtime celebration. Cute food turns eating into play, which is especially helpful for picky eaters. When a child helps decorate the face, they are far more likely to eat every bite, including the little pieces of vegetable that make up the whiskers and noses.
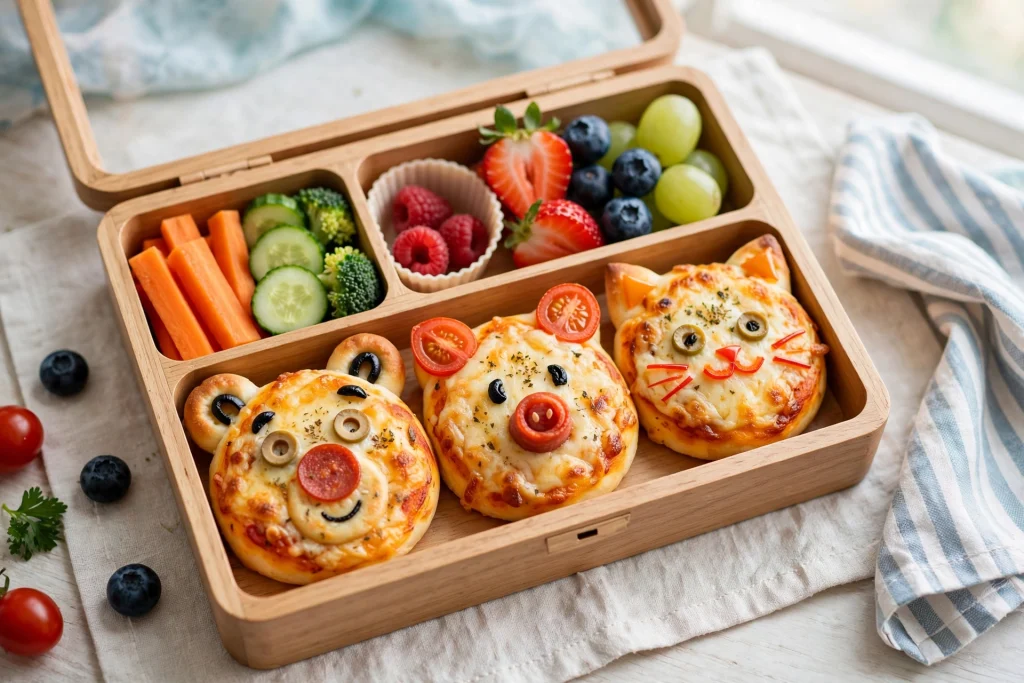
These pizzas are also ideal for lunchboxes because of their size. Each one is about the width of your palm, so it fits neatly in a bento box or a standard container, and it is easy for small hands to hold. There is no sauce dripping everywhere, since the sauce is spread thin and covered with cheese.
Here is why this recipe works so well:
- One dough, five shapes. You do not need five different recipes. Everything starts from the same soft dough.
- Mild flavors. Mozzarella, a sweet tomato sauce and a few gentle toppings make them friendly for sensitive palates.
- Make-ahead friendly. They keep well in the fridge and freeze beautifully.
- Fully customizable. Swap toppings for whatever your child likes, or whatever is in your fridge.
Ingredients
For the pizza dough (makes 10 mini pizzas)
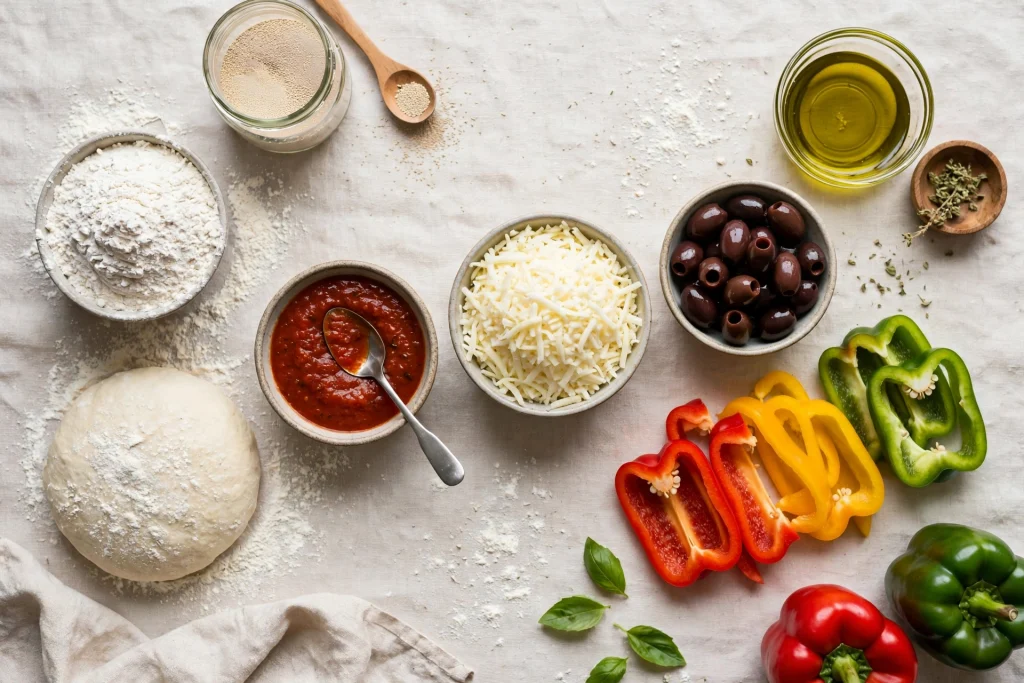
- 3 cups (375 g) all-purpose flour, plus extra for dusting
- 1 packet (2¼ teaspoons / 7 g) instant or active dry yeast
- 1 teaspoon sugar
- 1 teaspoon fine salt
- 1 cup (240 ml) warm water (about 105°F / 40°C)
- 2 tablespoons olive oil, plus extra for the bowl
Shortcut: Use 1 lb (450 g) of store-bought pizza dough, thawed and brought to room temperature. It works perfectly and saves you the rising time.
For the easy pizza sauce
- ½ cup (120 g) tomato passata or plain tomato sauce
- 1 tablespoon tomato paste
- ½ teaspoon dried oregano
- ¼ teaspoon garlic powder
- 1 teaspoon olive oil
- A tiny pinch of sugar (optional, to soften acidity)
For the toppings and faces
- 2 cups (200 g) shredded low-moisture mozzarella
- Black olives, sliced into rings (eyes)
- Green olives (noses and cat eyes)
- Small pepperoni slices or turkey pepperoni (cheeks, ears and hearts)
- Red bell pepper, cut into tiny triangles and squares (noses, ear centers)
- Green bell pepper or chives, cut into thin strips (whiskers)
- Cherry tomatoes, sliced (star and heart decoration)
- Fresh basil leaves
- Dried Italian herbs, for sprinkling
Equipment You Will Need
- Large mixing bowl
- Rolling pin
- Two baking sheets and parchment paper
- A round cutter or glass, about 3.5 inches (9 cm) wide
- A small star cutter and a small heart cutter (optional but helpful)
- A sharp knife or pizza cutter
- A small spoon for spreading sauce
Step-by-Step Instructions
Step 1: Make the dough
In a large bowl, mix the flour, yeast, sugar and salt. Add the warm water and olive oil. Stir with a wooden spoon until a shaggy dough forms, then turn it onto a floured surface and knead for 6 to 8 minutes, until smooth, soft and slightly springy. If it sticks, add a teaspoon of flour at a time. Be careful not to add too much, because a slightly tacky dough makes the softest crust.
Step 2: Let it rise
Place the dough in a lightly oiled bowl, cover with a clean towel and leave it somewhere warm for 45 minutes, until doubled in size. In a hurry? Skip this step by using store-bought dough.
Step 3: Make the sauce
Stir all the sauce ingredients together in a small bowl. There is no cooking required. Because the pizzas bake, the flavors blend beautifully in the oven.
Step 4: Preheat and prepare
Preheat your oven to 425°F (220°C). Line two baking sheets with parchment paper. A hot oven gives you a golden crust with a soft, fluffy inside, which is exactly the texture kids enjoy.
Step 5: Divide and shape the base
Punch down the risen dough and divide it into 10 equal pieces. Roll each piece into a ball, then flatten it on a floured surface into a disc about ¼ inch (6 mm) thick. Do not roll it too thin, because thicker crusts stay soft in a lunchbox.
For the round animals (bunny, bear and kitty), cut a neat 3.5-inch circle. For the star and heart, roll the dough and cut with the shaped cutters, or shape by hand. Save every scrap of dough, because you will use it for ears.
Step 6: Add the ears and details
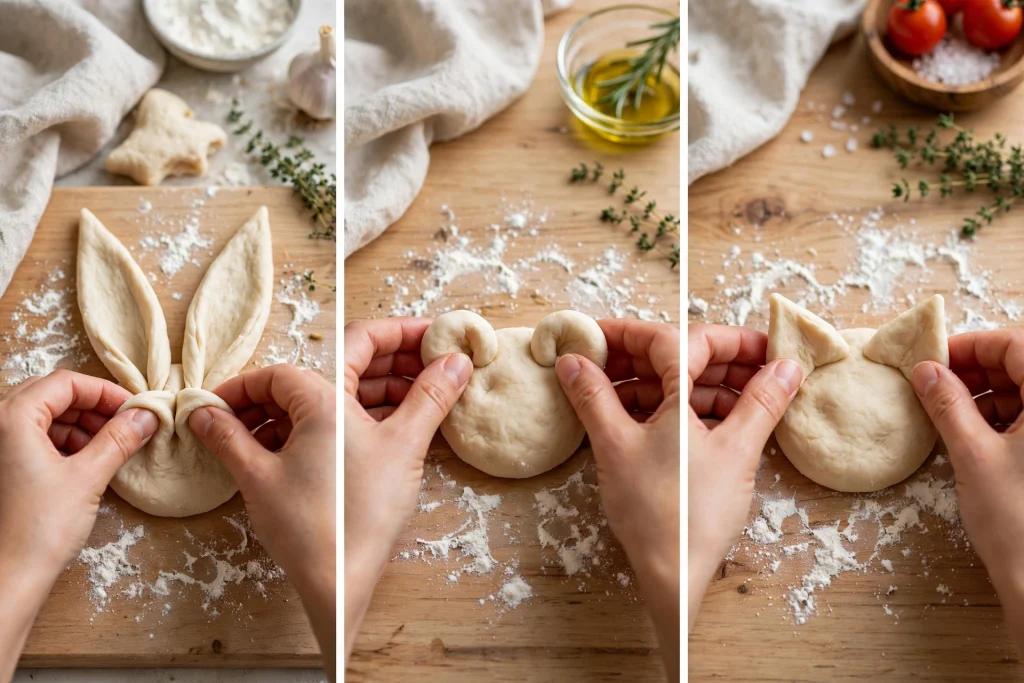
This is where the magic happens.
- Bunny: Roll two small logs from the scraps, flatten them slightly and pinch them to a point. Press them at the top of the circle for long ears.
- Bear: Roll two tiny balls and press them on the upper left and right sides for round ears. Add one small flat circle in the center of the face for the muzzle.
- Kitty: Cut two small triangles from scrap dough and press them on the top corners for pointed ears.
Brush the joins with a little water so the pieces stay attached during baking.
Step 7: Sauce and cheese
Transfer the shapes to the baking sheets. Spread about 1 teaspoon of sauce on each, leaving a small border. Keep the sauce thin, since too much can make the pizza soggy. Sprinkle with mozzarella, but not too heavily, so the faces still show clearly.
Step 8: Decorate the faces
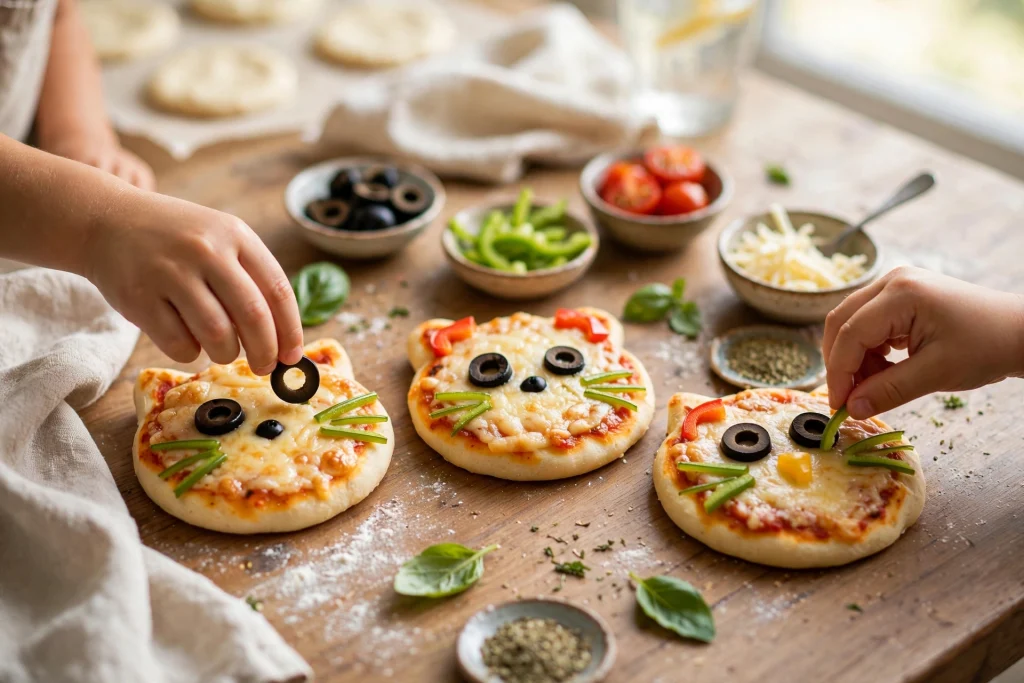
Now bring your animals to life:
- Bunny: Two black olive rings for eyes, a tiny red pepper triangle for the nose, three thin green pepper strips on each side for whiskers, and a small pepperoni slice inside each ear.
- Bear: Two olive rings for eyes, a green olive slice on the muzzle for the nose, a curved olive piece for the mouth and pepperoni circles for rosy cheeks.
- Kitty: Two olive rings for eyes, a red pepper triangle for the nose, pepper strips for whiskers and a small pepperoni triangle inside each ear.
- Star: Decorate with pepperoni and olives to form a friendly little face, or cover with tomato slices and basil.
- Heart: Arrange pepperoni circles around the edge and add a tiny green pepper heart in the middle. Perfect for Valentine’s Day or a love note in the lunchbox.
Step 9: Bake
Bake for 14 to 16 minutes, until the crust is golden and the cheese is bubbling and lightly browned at the edges. Rotate the pans halfway through for even baking. If the ears brown too quickly, cover them lightly with a tiny piece of foil.
Step 10: Cool and finish
Let the pizzas rest on a wire rack for 5 minutes. Sprinkle with a little dried herbs for that final bakery-style finish. Allow them to cool completely before packing, which prevents steam from making the crust soft and damp.
Tips for Perfect Mini Pizzas
Keep the dough at a good thickness. About ¼ inch is ideal. Too thin, and the pizzas turn crispy and dry, which is not what you want in a lunchbox.
Use low-moisture mozzarella. Fresh mozzarella releases too much water. The shredded low-moisture variety melts smoothly and keeps its shape, so the faces stay neat.
Do not overload the toppings. Faces need space. A few well-placed pieces look cuter than a crowded pizza.
Let the pizzas cool before packing. Warm pizzas trapped in a container create condensation. Cool completely, then close the lid.
How to Pack These Pizzas in a Lunchbox
A good lunchbox pizza should be easy to open, easy to eat and not messy. Here is what works best:
- Place a small piece of parchment paper between pizzas so the faces do not stick together.
- Use a bento box with small compartments to keep the pizzas from sliding around.
- Add a few crisp sides, such as cucumber sticks, baby carrots, apple slices or grapes, for a balanced meal.
- Include a small container of extra pizza sauce for dipping if your child likes it.
- If your child eats lunch cold, pack an ice pack to keep everything fresh until lunchtime.
For a full, balanced lunch, pair two mini pizzas with a piece of fruit, a vegetable and a small yogurt or cheese stick.
Make-Ahead, Storage and Freezing
Fridge: Store cooled pizzas in an airtight container for up to 3 days. Place parchment between the layers.
Freezer: Freeze baked and cooled pizzas on a tray for one hour, then transfer them to a freezer bag. They keep well for up to 2 months. Thaw in the fridge overnight and pack them in the lunchbox in the morning. They will be defrosted by lunchtime.
Reheating: Warm in a 350°F (175°C) oven for 6 to 8 minutes, or in an air fryer for 3 to 4 minutes. Avoid the microwave if you want the crust to stay soft rather than chewy.
Make the dough ahead: The dough can rest in the fridge for up to 24 hours after its first rise. Bring it to room temperature for 20 minutes before shaping.
Easy Variations
- Whole wheat: Replace half the flour with whole wheat flour and add one extra tablespoon of water.
- Vegetarian: Skip the pepperoni and use bell pepper, sweetcorn, cherry tomatoes and basil.
- Hidden veggies: Stir finely grated zucchini or carrot into the sauce.
- Dairy-free: Use a good dairy-free mozzarella alternative.
Nutrition Information (per mini pizza, approximate)
- Calories: 190
- Protein: 8 g
- Carbohydrates: 26 g
- Fat: 6 g
- Fiber: 1.5 g
- Sodium: 340 mg
Values are estimates and vary with the brands and toppings you use.
Frequently Asked Questions
Can I use store-bought dough?
Yes. Ready-made pizza dough saves time and works beautifully. Roll it out gently and let it relax for a few minutes if it springs back.
How do I keep the ears from falling off?
Brush the joining areas with a bit of water and press gently. Do not use too much sauce near the ears, since it makes them slide.
Will the pizzas stay soft until lunchtime?
Yes, as long as you cool them completely and keep the sauce thin. The crust stays soft and pleasant even at room temperature.
Can I make these without yeast?
Yes. Mix 1½ cups self-raising flour with 1½ cups plain Greek yogurt to make a quick two-ingredient dough. Knead briefly, shape and bake at the same temperature for 12 to 14 minutes.
Are they good for picky eaters?
They are one of the best ways to introduce new vegetables, because the toppings become part of the fun. Start with a familiar cheese base and add one new vegetable at a time.
Final Thoughts
These 5 cute animal mini pizzas prove that a homemade lunchbox does not have to be complicated to be memorable. With one easy dough, a quick sauce and a handful of colorful toppings, you can create a bunny, a bear, a kitty, a star and a heart that will make any child smile when they open their lunch.
They are perfect for school days, birthday parties, picnics and cozy weekend cooking with the kids. Make a batch on Sunday, freeze a few and enjoy stress-free mornings all week long.
Try the recipe and tell me which animal is your child’s favorite. I would love to hear how yours turned out, so leave a comment below and share your creations. Happy baking, and happy lunchbox packing!