There’s a reason yellow cake with chocolate frosting shows up at birthday parties again and again — it’s a pairing that never goes out of style. This classic vanilla birthday layer cake features two soft, golden vanilla cake layers with a rich, custardy flavor, wrapped in silky chocolate frosting. If vanilla cakes have let you down in the past with a dry or crumbly texture, this recipe solves that problem with a simple trick: combining butter and oil in the batter.
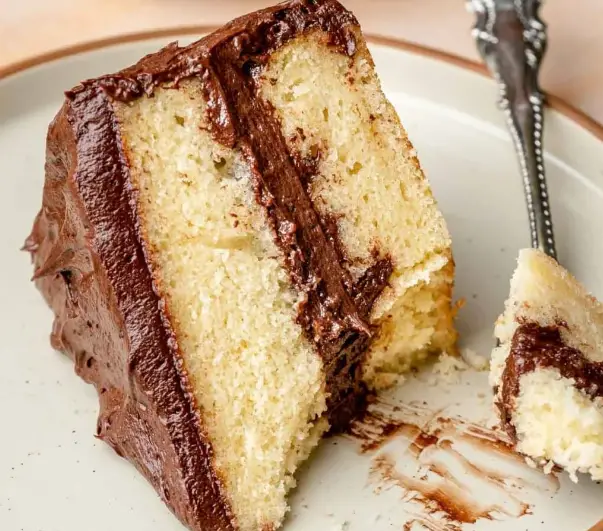
This cake strikes the perfect balance between structure and softness — sturdy enough to stack and frost, yet incredibly tender and moist in every bite. Whether it’s a birthday, a graduation, or just a Tuesday that calls for cake, this one delivers every time.
Why This Recipe Works
- Butter and oil combined — butter brings flavor, while a touch of neutral oil keeps the crumb soft and moist, since oil stays liquid at room temperature while butter partially solidifies.
- Whole eggs for richness — they give the cake its golden color, tender crumb, and rounded, custardy vanilla flavor.
- Sour cream or yogurt — adds tang, moisture, and a luxuriously soft texture to the crumb.
- Warm milk — helps the batter emulsify smoothly and encourages an even rise.
- Rich chocolate frosting — smooth, glossy, and not overly sweet, pairing beautifully with the vanilla layers.
Ingredient Notes
A few key ingredients make a real difference in this cake:
- All-purpose flour works perfectly here — no need for cake flour. Just measure carefully, since too much flour is the most common cause of dry, dense cake. Spoon the flour into your measuring cup and level it off, or use a kitchen scale for best accuracy.
- Neutral oil, such as sunflower, canola, or vegetable oil, keeps the layers soft since it remains liquid at room temperature, unlike butter.
- Sour cream or plain yogurt adds moisture and a subtle tang that balances the sweetness of the cake.
- Good quality vanilla extract matters — it’s the star flavor of this cake, so don’t skimp here.
- Warm milk, rather than cold, helps the batter come together smoothly without overmixing.
Recipe Overview
| Detail | Info |
|---|---|
| Prep Time | 30 minutes |
| Cook Time | 30 minutes |
| Total Time | 1 hour |
| Servings | 10 slices |
| Calories | 410 kcal per slice |
| Difficulty | Moderate |
| Cuisine | American |
| Course | Dessert |
Ingredients
For the Vanilla Cake
- 2 ¼ cups (280g) all-purpose flour
- 1 ½ teaspoons baking powder
- ½ teaspoon baking soda
- ¾ teaspoon salt
- ½ cup (115g) unsalted butter, softened
- 1 ½ cups (300g) granulated sugar
- 2 teaspoons pure vanilla extract
- 3 tablespoons neutral vegetable oil
- 3 large eggs, room temperature
- ½ cup (120ml) full-fat plain yogurt or sour cream
- 1 cup (240ml) whole milk, warmed
For the Chocolate Frosting
- 8 oz (225g) milk chocolate, finely chopped
- 1 cup (240ml) heavy whipping cream
- 2 tablespoons unsweetened cocoa powder
- 2 tablespoons sour cream
- Pinch of salt
Instructions
Step 1: Prepare the Oven and Pans
Preheat your oven to 350°F (175°C). Lightly grease two 8-inch round cake pans, dust with flour, and line the bottoms with parchment paper rounds.
Step 2: Mix the Dry Ingredients
Sift the flour, baking powder, baking soda, and salt into a medium bowl and whisk to combine evenly.
Step 3: Cream the Butter and Sugar
In a large bowl, combine the softened butter with half of the sugar and the vanilla extract. Beat on medium speed until blended, about 30 seconds. Gradually add the remaining sugar, then increase to medium-high speed and beat for 3–4 minutes until pale and fluffy, scraping down the bowl as needed. Add the oil and beat for another minute.
Step 4: Add the Eggs and Yogurt
Beat in the eggs one at a time, mixing well after each addition and scraping the bowl. Mix in the yogurt or sour cream. Add one-third of the flour mixture and mix on low speed just until combined.
Step 5: Alternate Dry and Wet Ingredients
Add the remaining flour mixture in two additions, alternating with the warm milk. Mix on low speed until just combined, then increase to high speed for about 5 seconds to bring the batter together — avoid overmixing.
Step 6: Bake the Cakes
Divide the batter evenly between the prepared pans and smooth the tops. Bake for 25–30 minutes, or until golden and a toothpick inserted into the center comes out clean and the cakes spring back when lightly pressed.
Step 7: Cool the Cakes Completely
Let the cakes cool in their pans for 10 minutes, then turn them out onto a wire rack. Allow them to cool completely before frosting — this step is essential to prevent the frosting from melting.
Step 8: Make the Chocolate Frosting
Place the finely chopped chocolate in a heatproof bowl. Heat the cream in a small saucepan until it just begins to simmer, then pour it over the chocolate. Let sit for a minute, then stir gently until smooth and glossy. Sift in the cocoa powder, then add the sour cream and salt, stirring gently to combine.
Step 9: Chill the Frosting
Refrigerate the frosting for about 10 minutes, then stir gently. Chill for another 10 minutes or so until it reaches a thick, spreadable consistency similar to pudding.
Step 10: Frost and Assemble
Use an offset spatula to spread the frosting over the cooled cake layers. Work efficiently and avoid excessive back-and-forth spreading, which can cause the frosting to stiffen too quickly.
Expert Baking Tips
- Don’t overbake — the cakes are done when they spring back to a light touch and a toothpick comes out clean; they should stay pale golden, not deeply browned.
- Use properly softened butter — take it out of the fridge a couple of hours ahead so it’s soft but not melted, for the best aeration when creaming.
- Bring eggs to room temperature for smoother incorporation into the batter.
- Always sift the dry ingredients to prevent dense pockets or tunnels in the finished cake.
- Cool the layers completely before frosting, or the chocolate frosting will melt and slide off.
Storage Instructions
Store the frosted cake in the refrigerator for up to 5 days, and let it come to room temperature before serving for the best texture. Unfrosted cake layers can be wrapped tightly and frozen for up to 3 months.
Frequently Asked Questions
Can I substitute sour cream for the yogurt in the batter? Yes, sour cream and plain yogurt can be used interchangeably in this recipe.
Can I make the cake layers ahead of time? Yes, bake the layers up to a day in advance, wrap tightly, and store at room temperature. Assemble with frosting when ready to serve.
Can I bake this in a 9×13-inch pan instead of layers? Yes, this batter works well as a sheet cake — expect a slightly longer bake time of around 30–35 minutes.
This classic vanilla birthday layer cake with chocolate frosting brings together everything a great celebration cake should be — soft, moist vanilla layers and rich, glossy chocolate frosting in every slice.
Classic Vanilla Birthday Layer Cake with Chocolate Frosting
Course: Uncategorized10
servings30
minutes30
minutes410
kcal1
hourThere’s a reason yellow cake with chocolate frosting shows up at birthday parties again and again — it’s a pairing that never goes out of style. This classic vanilla birthday layer cake features two soft, golden vanilla cake layers with a rich, custardy flavor, wrapped in silky chocolate frosting. If vanilla cakes have let you down in the past with a dry or crumbly texture, this recipe solves that problem with a simple trick: combining butter and oil in the batter.
Ingredients
- For the Vanilla Cake
2 ¼ cups (280g) all-purpose flour
1 ½ teaspoons baking powder
½ teaspoon baking soda
¾ teaspoon salt
½ cup (115g) unsalted butter, softened
1 ½ cups (300g) granulated sugar
2 teaspoons pure vanilla extract
3 tablespoons neutral vegetable oil
3 large eggs, room temperature
½ cup (120ml) full-fat plain yogurt or sour cream
1 cup (240ml) whole milk, warmed
- For the Chocolate Frosting
8 oz (225g) milk chocolate, finely chopped
1 cup (240ml) heavy whipping cream
2 tablespoons unsweetened cocoa powder
2 tablespoons sour cream
Pinch of salt
Directions
- Preheat your oven to 350°F (175°C). Lightly grease two 8-inch round cake pans, dust with flour, and line the bottoms with parchment paper rounds.
- Sift the flour, baking powder, baking soda, and salt into a medium bowl and whisk to combine evenly.
- In a large bowl, combine the softened butter with half of the sugar and the vanilla extract. Beat on medium speed until blended, about 30 seconds. Gradually add the remaining sugar, then increase to medium-high speed and beat for 3–4 minutes until pale and fluffy, scraping down the bowl as needed. Add the oil and beat for another minute.
- Beat in the eggs one at a time, mixing well after each addition and scraping the bowl. Mix in the yogurt or sour cream. Add one-third of the flour mixture and mix on low speed just until combined.
- Add the remaining flour mixture in two additions, alternating with the warm milk. Mix on low speed until just combined, then increase to high speed for about 5 seconds to bring the batter together — avoid overmixing.
- Divide the batter evenly between the prepared pans and smooth the tops. Bake for 25–30 minutes, or until golden and a toothpick inserted into the center comes out clean and the cakes spring back when lightly pressed.
- Let the cakes cool in their pans for 10 minutes, then turn them out onto a wire rack. Allow them to cool completely before frosting — this step is essential to prevent the frosting from melting.
- Place the finely chopped chocolate in a heatproof bowl. Heat the cream in a small saucepan until it just begins to simmer, then pour it over the chocolate. Let sit for a minute, then stir gently until smooth and glossy. Sift in the cocoa powder, then add the sour cream and salt, stirring gently to combine.
- Refrigerate the frosting for about 10 minutes, then stir gently. Chill for another 10 minutes or so until it reaches a thick, spreadable consistency similar to pudding.
- Use an offset spatula to spread the frosting over the cooled cake layers. Work efficiently and avoid excessive back-and-forth spreading, which can cause the frosting to stiffen too quickly.