If you’re searching for the best traditional red velvet cake recipe, this one hits every mark. With its striking red color, subtle cocoa flavor, and irresistibly soft, velvety crumb, red velvet cake is a Southern classic that’s as beautiful as it is delicious. Layered with tangy cream cheese frosting, this cake offers the perfect balance of sweetness and richness in every slice.
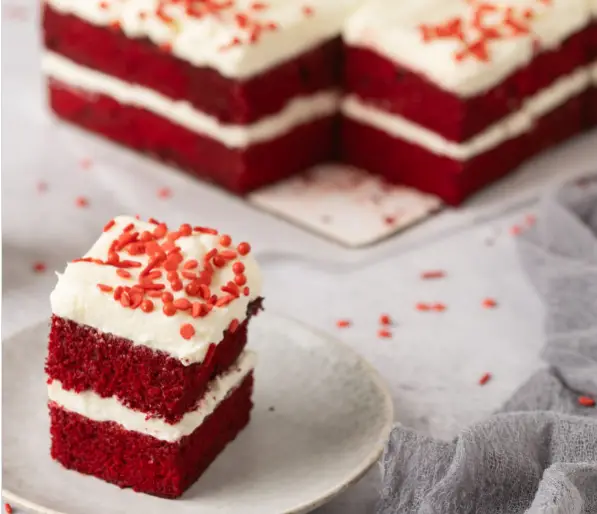
The signature texture of red velvet comes from a combination of buttermilk, vinegar, and a touch of cocoa powder, creating a tender crumb with a delicate tang that pairs beautifully with the classic cream cheese frosting. This recipe stays true to the traditional method, giving you an authentic red velvet cake every time.
Why You’ll Love This Red Velvet Cake Recipe
- Vibrant red color with a soft, velvety crumb
- Subtle cocoa flavor balanced with tangy buttermilk
- Classic cream cheese frosting that pairs perfectly
- Moist texture that stays fresh for days
- A true Southern classic for any celebration
Recipe Overview
| Detail | Info |
|---|---|
| Prep Time | 25 minutes |
| Cook Time | 30 minutes |
| Total Time | 55 minutes |
| Servings | 12 slices |
| Calories | 390 kcal per slice |
| Difficulty | Moderate |
| Cuisine | Southern American |
| Course | Dessert |
Ingredients
For the Red Velvet Cake
- 2 ½ cups (315g) all-purpose flour
- 2 tablespoons unsweetened cocoa powder
- 1 teaspoon baking soda
- ½ teaspoon salt
- 1 cup (225g) unsalted butter, softened
- 2 cups (400g) granulated sugar
- 3 large eggs, room temperature
- 1 cup (240ml) buttermilk, room temperature
- 2 tablespoons red food coloring
- 1 teaspoon white vinegar
- 2 teaspoons pure vanilla extract
For the Cream Cheese Frosting
- 16 oz (450g) cream cheese, softened
- 1 cup (225g) unsalted butter, softened
- 4 cups (480g) powdered sugar
- 1 tablespoon vanilla extract
- Pinch of salt
Instructions
Step 1: Prepare the Oven and Pans
Preheat your oven to 350°F (175°C). Grease and flour two 9-inch round cake pans, and line the bottoms with parchment paper rounds.
Step 2: Mix the Dry Ingredients
In a medium bowl, whisk together the flour, cocoa powder, baking soda, and salt. Set aside.
Step 3: Cream Butter and Sugar
In a large mixing bowl, beat the softened butter and sugar together until light and fluffy, about 4 minutes.
Step 4: Add Eggs and Flavorings
Add the eggs one at a time, beating well after each addition. Mix in the red food coloring, vinegar, and vanilla extract until fully combined.
Step 5: Combine Wet and Dry Ingredients
Gradually add the flour mixture, alternating with the buttermilk. Begin and end with the flour mixture, mixing just until combined. Avoid overmixing.
Step 6: Divide and Bake
Divide the batter evenly between the prepared pans and smooth the tops. Bake for 25–30 minutes, or until a toothpick inserted into the center comes out clean.
Step 7: Cool the Cakes
Let the cakes cool in their pans for 10 minutes, then turn them out onto a wire rack to cool completely.
Step 8: Make the Cream Cheese Frosting
Beat the softened cream cheese and butter together until smooth and creamy. Gradually add the powdered sugar, then mix in the vanilla extract and salt, beating until light and fluffy.
Step 9: Frost and Assemble
Once the cake layers are completely cool, spread a generous layer of frosting between the layers, then frost the top and sides smoothly with the remaining frosting.
Step 10: Slice and Serve
Slice the cake and serve at room temperature for the best flavor and texture.
Tips for the Perfect Red Velvet Cake
- Use buttermilk and vinegar together for the classic tangy flavor and tender crumb that defines red velvet.
- Sift the cocoa powder with the dry ingredients to avoid clumps and ensure even color and flavor distribution.
- Let the cakes cool completely before frosting, since cream cheese frosting is soft and can melt easily.
- Chill the frosted cake briefly before slicing for clean, neat cuts.
Storage Instructions
Because this cake is frosted with cream cheese frosting, store it in an airtight container in the refrigerator for up to 5 days. Bring to room temperature before serving for the best texture. Unfrosted cake layers can be frozen, tightly wrapped, for up to 3 months.
Frequently Asked Questions
Why is red velvet cake red? Traditionally, a small amount of cocoa powder reacting with buttermilk and vinegar gave the cake a reddish tint, though most modern recipes, including this one, use red food coloring for a more vibrant color.
Can I make this cake without food coloring? Yes, simply omit the food coloring — the cake will taste the same, just without the signature red hue.
Can I make this cake into cupcakes? Yes, divide the batter into a lined muffin tin and bake for 18–20 minutes.
This traditional red velvet cake recipe delivers everything you love about the classic — a moist, tender crumb, subtle cocoa flavor, and rich cream cheese frosting in every bite.
Let the cakes cool in their pans for 10 minutes, then turn them out onto a wire rack to cool completely.
Slice the cake and serve at room temperature for the best flavor and texture.
Traditional Red Velvet Cake Recipe
Course: Uncategorized12
servings25
minutes30
minutes390
kcal55
minutesIf you’re searching for the best traditional red velvet cake recipe, this one hits every mark. With its striking red color, subtle cocoa flavor, and irresistibly soft, velvety crumb, red velvet cake is a Southern classic that’s as beautiful as it is delicious. Layered with tangy cream cheese frosting, this cake offers the perfect balance of sweetness and richness in every slice.
Ingredients
- For the Red Velvet Cake
2 ½ cups (315g) all-purpose flour
2 tablespoons unsweetened cocoa powder
1 teaspoon baking soda
½ teaspoon salt
1 cup (225g) unsalted butter, softened
2 cups (400g) granulated sugar
3 large eggs, room temperature
1 cup (240ml) buttermilk, room temperature
2 tablespoons red food coloring
1 teaspoon white vinegar
2 teaspoons pure vanilla extract
- For the Cream Cheese Frosting
16 oz (450g) cream cheese, softened
1 cup (225g) unsalted butter, softened
4 cups (480g) powdered sugar
1 tablespoon vanilla extract
Pinch of salt
Directions
- Preheat your oven to 350°F (175°C). Grease and flour two 9-inch round cake pans, and line the bottoms with parchment paper rounds.
- In a medium bowl, whisk together the flour, cocoa powder, baking soda, and salt. Set aside.
- In a large mixing bowl, beat the softened butter and sugar together until light and fluffy, about 4 minutes.
- Add the eggs one at a time, beating well after each addition. Mix in the red food coloring, vinegar, and vanilla extract until fully combined.
- Gradually add the flour mixture, alternating with the buttermilk. Begin and end with the flour mixture, mixing just until combined. Avoid overmixing.
- Divide the batter evenly between the prepared pans and smooth the tops. Bake for 25–30 minutes, or until a toothpick inserted into the center comes out clean.
- Let the cakes cool in their pans for 10 minutes, then turn them out onto a wire rack to cool completely.
- Beat the softened cream cheese and butter together until smooth and creamy. Gradually add the powdered sugar, then mix in the vanilla extract and salt, beating until light and fluffy.
- Once the cake layers are completely cool, spread a generous layer of frosting between the layers, then frost the top and sides smoothly with the remaining frosting.
- Slice the cake and serve at room temperature for the best flavor and texture.